Imagine this scenario.
There’s a newly released skincare product you have wanted to try for a long time. You quickly rush to the store, purchase it and slather it on.
Then you begin to wait for clear skin. But instead of improved skin, all you get is inflamed, sore-to-the-touch skin.
Many people have experienced this common skincare mishap.
Be it allergic reactions or terrible breakouts, almost every skincare product—even natural ones—carries the risk of irritation.
Fortunately, there’s a way to prevent this from happening—patch testing. In this article, we will cover the topic of patch testing and provide guidance on how to patch test skincare products.
What is patch testing?
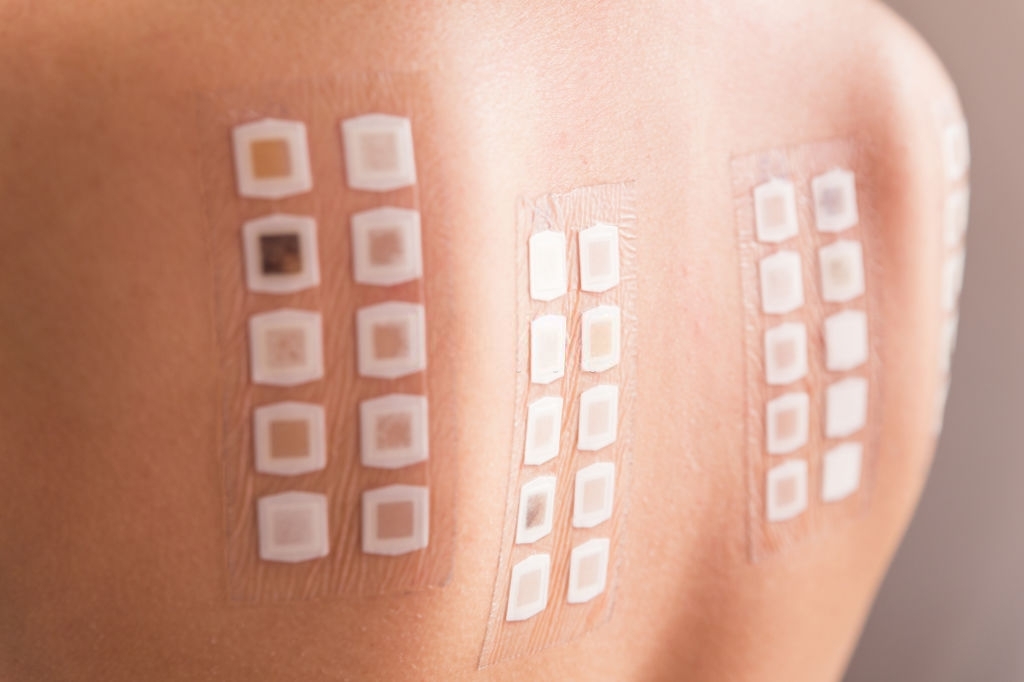
Patch testing is a simple but effective way of checking how your skin will react to new skincare products like moisturizers, serums, topical creams, etc.
It is a common way to check if you are allergic to one or more ingredients in a skincare product or if the product will trigger breakouts on your skin.
This is especially important if you have Malassezia Folliculitis (yeast infection acne), a.k.a. fungal acne.
Why is patch testing important for fungal acne-prone skin?
Fungal acne is a condition that is accompanied by a lot of itching. People with fungal acne might most often end up scratching at the fungal acne pustules, thereby irritating the skin and forming lesions.
When a skincare product that contains an irritating ingredient is applied to skin with fungal acne, it can exacerbate the symptoms.
Some might provoke allergic reactions, while others might contain ingredients that can trigger fungal acne breakouts.
It’s critical to patch test as it can help avoid allergic reactions or more fungal acne breakouts, which can cause more itching.
Patch testing is like a safety test for skincare products.
How to patch test skincare products
Patch testing is not as complicated as some people think it is. It is actually very simple. The only catch is that you’ll need to make out some time (1-3 weeks) to do your patch test in the right way.
Below are the steps to take while patch-testing a skincare product.
Patch test on a clear area of your skin
You have to choose a clear, accessible area of your skin to test your skincare product on. This area should be one you can do without touching for at least 24 hours.
The ideal area should be hidden in case a reaction occurs. It should also be close to the place you’re going to be using the product on, once you’re sure it is safe.
For instance, if you’ll be using the product on your face, you can patch test on the side of your neck or the skin behind your ear.
If you will use the product on some other part of your body, you can test on the skin in the crook of your elbow or the skin behind your knees. You can also try on your upper arms and stomach.
Cleanse the area
Before you do anything, you have to make sure the area you’re going to do the test on is clean.
This is because you will be monitoring the reactions on it, if there are any. When the area is clean, and there’s eventually a reaction, you’ll be sure that it’s the new product that caused it and not something else that was on it before.
Smear a tiny amount of the product on the skin patch
You only need a small amount of the skincare product to do a patch test. Apply this product to the area of skin you chose and cover it with a Band-Aid.
If you are testing the skincare product for irritation, pick the area where you are most sensitive. This area is different for many people.
If you are testing to see if the product will clog your pores and/or cause you breakouts, apply it to the area of your skin that is most prone to clogged pores and breakouts. This area varies from person to person too.
Make sure that there are no other products on the skin so that you can patch test “this” product correctly.
How long should you patch test skin care products for optimal safety?
After covering the area with a Band-Aid, you’ll need to wait for 24 hours before removing it.
If you experience any soreness, itching, or burning before the time is up, it is advisable to remove the Band-Aid immediately and wash the area.
If you are testing for allergic reactions, they usually occur within 24 hours, but you might need to wait for up to 72 hours.
What you should look for
After applying the product to the skin patch, you should pay attention to how your skin reacts to it.
After your 24 hours are up, you can take off the Band-Aid.
As earlier mentioned, you can take off the Band-Aid right away if you experience pain or irritation before 24 hours. If you don’t, keep it on for the required time.
Allergic Reactions
The moment you remove the Band-Aid, the skin patch might be pink or red because of the pull. This should fade in a few minutes. If it doesn’t, you probably have a mild allergy to the product. In this case, you should discontinue the usage of that product.
The mild pink or red appearance could also mean that the product is meant to act that way. Products that contain face acids such as salicylic, glycolic, and lactic acids, or compounds like retinol or hydroquinone, might cause the skin to appear pinkish.
However, this pink hue should not last very long. It will usually occur almost immediately after applying it and does not last longer than 30 minutes. If the reaction lasts more than an hour without getting better, discontinue the use of the product.
If you notice that the skin area is red, rough, itchy, or has developed a rash, you are likely severely allergic to the product. If so, it is advisable not to use it on your skin.
It is possible to not be sure, though. If you have had severe allergic reactions to skincare products before, it is best that you have a chat with your doctor or dermatologist.
Breakouts
If you are testing the product’s comedogenicity, you should look out for new pimples, whiteheads, or blackheads. These are noticeable, but you might need to use a magnifying glass or mirror to examine the skin patch for clogged pores.
If the product breaks you out, it’s logical not to use it in your skincare routine.
No visible reaction
If your skin does not react negatively at all, then you’re good to go!
P.S.: Some popular skincare ingredients are more likely to cause an adverse reaction than others. These ingredients are known as triggers.
For general products, they include fatty alcohols, parabens, sulfates, phthalates, preservatives, synthetic dyes and fragrances, and products with high concentrations of face acids and compounds like retinol and niacinamide.
For people with fungal acne, other skincare triggers to avoid include most oils (coconut oil, almond oil, aloe vera oil, argan oil, grapeseed oil, jojoba oil, marula oil, neem oil, moringa oil, pomegranate oil, tamanu oil, rosehip oil, olive oil, etc.).
Problematic emulsifiers like beeswax, candelilla wax, carnauba wax, rice bran wax, glyceryl stearate SE, lecithin, polysorbate 20 (40, 60, 80), cetearyl alcohol, stearic acid, palmitic acid, hydrogenated castor oil, and stearyl alcohol can also trigger fungal acne breakouts.
Conclusion
Patch testing is a fool-proof way to make sure that a product will work positively for your skin rather than against it.
It is advised that people with fungal acne should patch test because most products that work fine for regular acne might actually trigger more fungal acne breakouts.
People with fungal acne generally have skin that is sensitive to many products, and the ingredients in some products can break them out really badly. A patch test can help them identify products and ingredients that will work well for their skin without worsening their condition.
If you have fungal acne and are not sure which ingredients can trigger a breakout or not, you can do a quick check with our handy ingredient checker.
Join the Folliculitis Scout Community
Above all know that you aren’t alone in your fungal acne problems. There’s a whole community of people with this issue that are ready to share their tips and tricks for treating the problem. We love our community at Folliculitis Scout! Socialize with us as well on Facebook. It’s so easy to Join and become part of a community that truly supports each other through the journey to better skin.